The Dynamic button turns on either a single ring or multiple rings of dynamic material. The Transits, Progressions or Solar Arc are switches controlled by either right clicking (Mac: Ctrl + click) or left clicking on the check box selections.
There are four selections; Transits, Progressions, Solar Arc (forward arc) and Solar Arc – (inverse arc). To distinguish the various dynamic listings, a subscript to indicate what the factor is will be added to the glyphs when you select a specific dynamic listing. These subscripts are T for transits, D for forward Solar Arc directions and I for inverse Solar Arc directions, and P for Secondary Progressions. When you left click on the selections you are inserting them into the Dial for examining them using Single-Disk Analysis where all the chart material is on a single ring, close to the Dial’s Grid. When you display dynamic material in the Single -Disk style, the glyphs are smaller than the original material on the dial and still have subscripts to identify them. Mixing all the factors displayed onto a single ring allows you to mix formulas between static and dynamic material and use the Dial as a protractor for measuring Solar Arc. This is a newer method developed by Hans Niggemann, Wayne Booher and Gary Christen and represents a highly efficient way of using the dial.
The Dynamic Flyout menu showing Transits selected. The button lights up red when a selection is in use. You can left click on a selection and the Dynamic will appear on the inner Dial Grid for Single Disk work. If you right click (Mac: Ctrl + click) a selection, the Dynamic will appear on its own Ring for Dual-Disk Analysis style work.
When you right click (Mac: Ctrl + click) on a selection, the dynamic material is set on separate Rings mimicking the traditional way Uranians examine a Dial layout called Dual-Disk Analysis.
After a Dynamic Option is selected, right clicking the Dynamic button toggles the dynamic selection between Ring 2 (large glyphs in outer ring 2) and the Grid Ring (small glyphs in inner ring 0). To remove a dynamic selection from the dial, the selection must first be moved to the Grid Ring (small glyphs in inner ring 0).
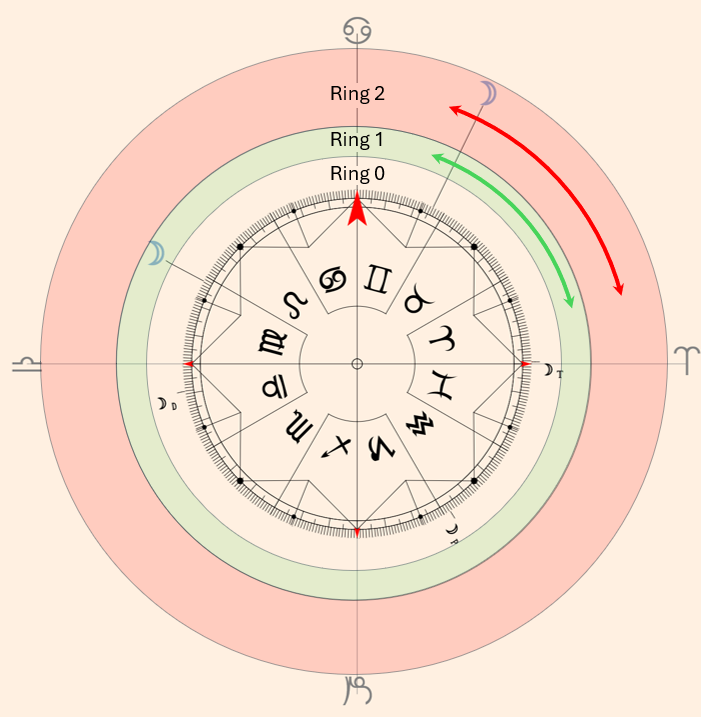
Chart factors in Ring 0 (the Dial Grid) are placed by left clicking any of the Dynamics options described below. Three Moons are shown in Ring 0. The subscript T indicates transiting factors, subscript D indicates Solar Arc forward directed factors, and subscript P indicates progressed factors. As shown by the three Moons, glyphs in Ring 0 are smaller than glyphs in Rings 1 and 2.
Ring 1 is the default dial ring for all types of charts. Right clicking (Mac: Ctrl + click) a Dynamics option will place the corresponding factors in Ring 2 for Dual-Disk Analysis. If more than one option is right clicked, the software rearranges the ring placements so that only one selected option appears in Ring 2, the other selected options move to Ring 0. Factors in Ring 0 may be combined with factors in Rings 1 and 2 for single disk analysis. Rings 1 and 2 are also used when two charts are selected in Synastry mode.
Factors in Ring 0 and Ring 1 always have subscript 1 when combined in planetary pictures. The labeling convention is shown in the following examples. Midpoint of transiting Moon and Ring 1 Moon:wñ1|w1. Midpoint of transiting Moon and Ring 2 Moon:wñ1|w2.
When Ring 2 is unlocked, use the mouse to drag factors in Ring 2 in either direction within the dark pink area illustrated above. The red two-way arrow indicates the region where Ring 2 factors can be dragged. When Ring 1 is unlocked, as indicated by the green two-way arrow, factors in Ring 1 can be dragged in either direction within the light green area.
To place a Ring 2 factor such as the Ascendant on a static point such as the 0o Libra point, put the mouse cursor on the Ring 2 Ascendant, when the cursor changes to a hand, drag it toward the Libra point. When you are close to the Libra point, hold down the
Control and Shift Keys and drag the mouse into the Libra point. The Ascendant will jump to and be perfectly aligned with the Libra point. Lock Ring 2 to maintain the rotated chart position. This technique is very useful for aligning factors between charts for Dual Disk Analysis. The same technique applies to moving factors when Ring 1 is unlocked. Factors in Ring 0 are not movable. They always maintain their true zodiacal positions.
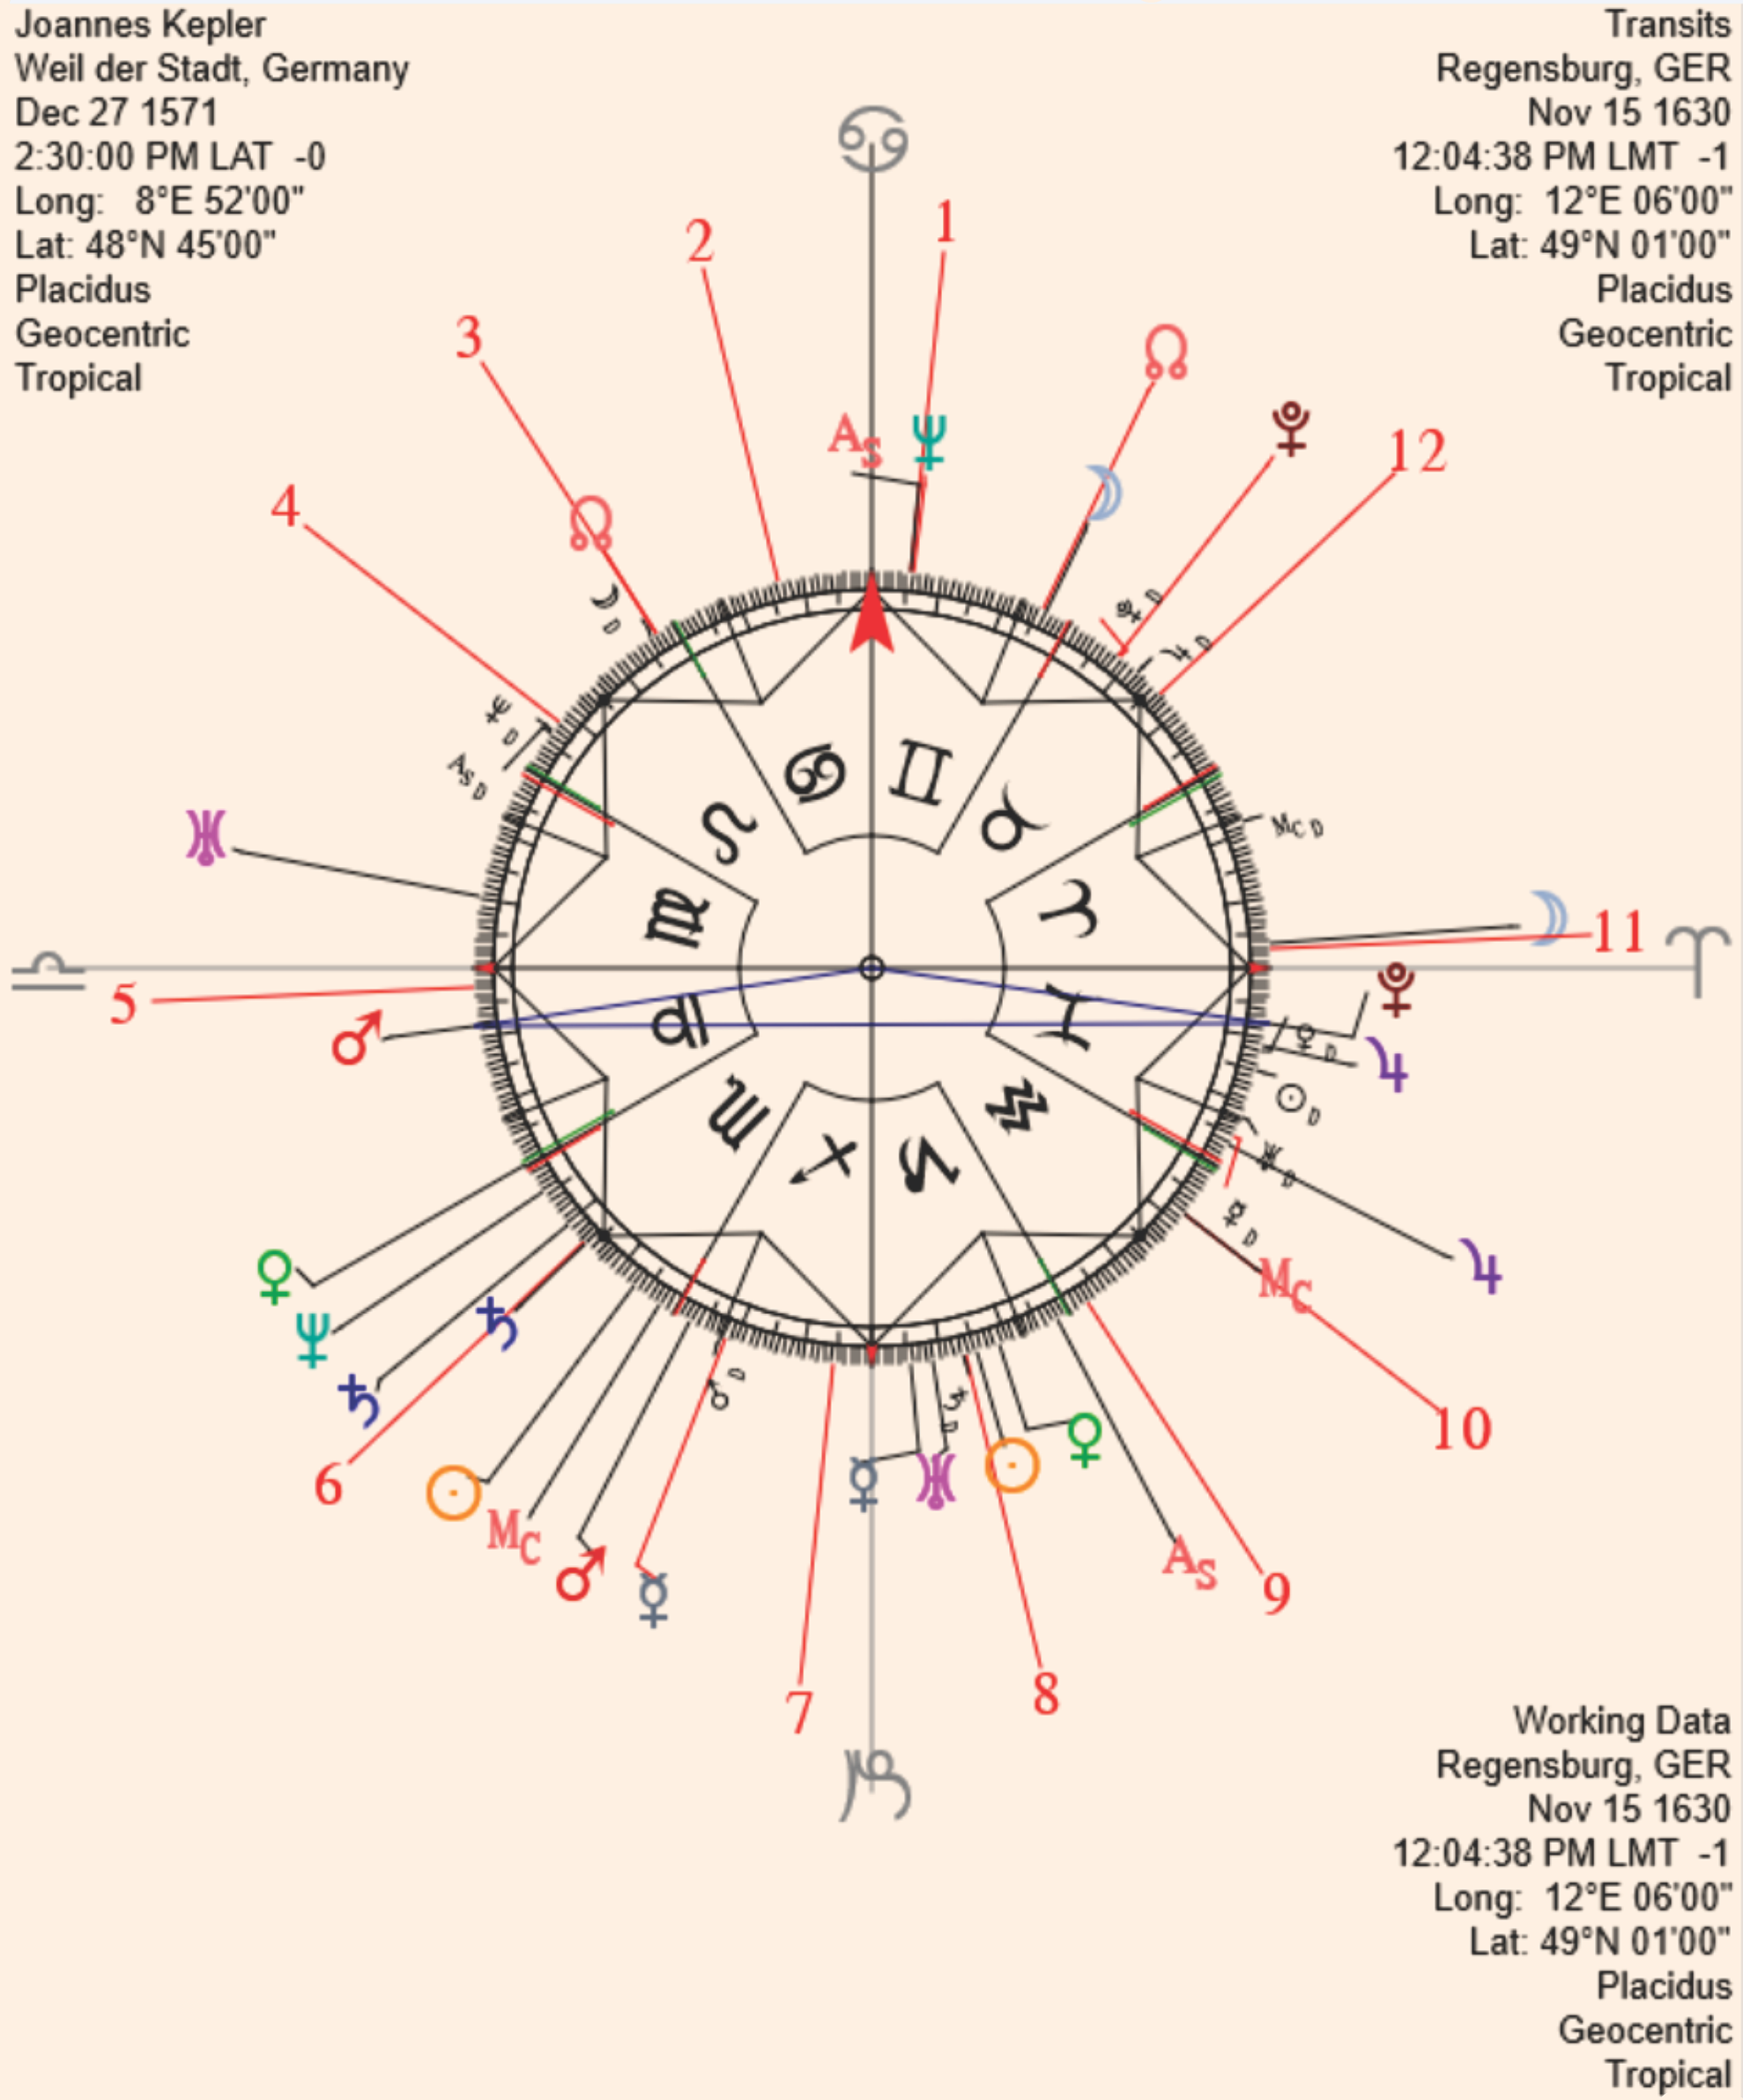
Dual Disk 360° setup for Kepler’s Death with the Directions on the Dial Grid (Ring 0), the natal positions on Ring 1 and the Transits on Ring 2. The house cusps are the longest lines and are sensitive to selections that include them in midpoints and planetary pictures. The Dynamic data is listed on the right-hand side of the Display Window with the Transit material on the upper right-hand side and the Directions (labeled as Working Data) on the lower right-hand side.
Right clicking (Mac: Ctrl + click) on a selection creates a second ring (Ring 2). You can right click (Mac: Ctrl + click) and select another Dynamic and the Dial will rearrange the material displayed so that a single Dynamic is in Ring 2 and the second Dynamic moves to Ring 0. The static horoscope (usually a natal chart) defaults to Ring 1, the first selected Dynamic becomes Ring 2 and the second selected Dynamic becomes the Dial Ring (Ring 0 with smaller glyphs and closer to the center). The house cusps extend beyond the various Rings. When you use Dual-Disk methods, you rotate the Rings and line them up to show Planetary Pictures, Differences and timing. While this method displays high levels of accuracy, it is complicated by the many levels of activity.
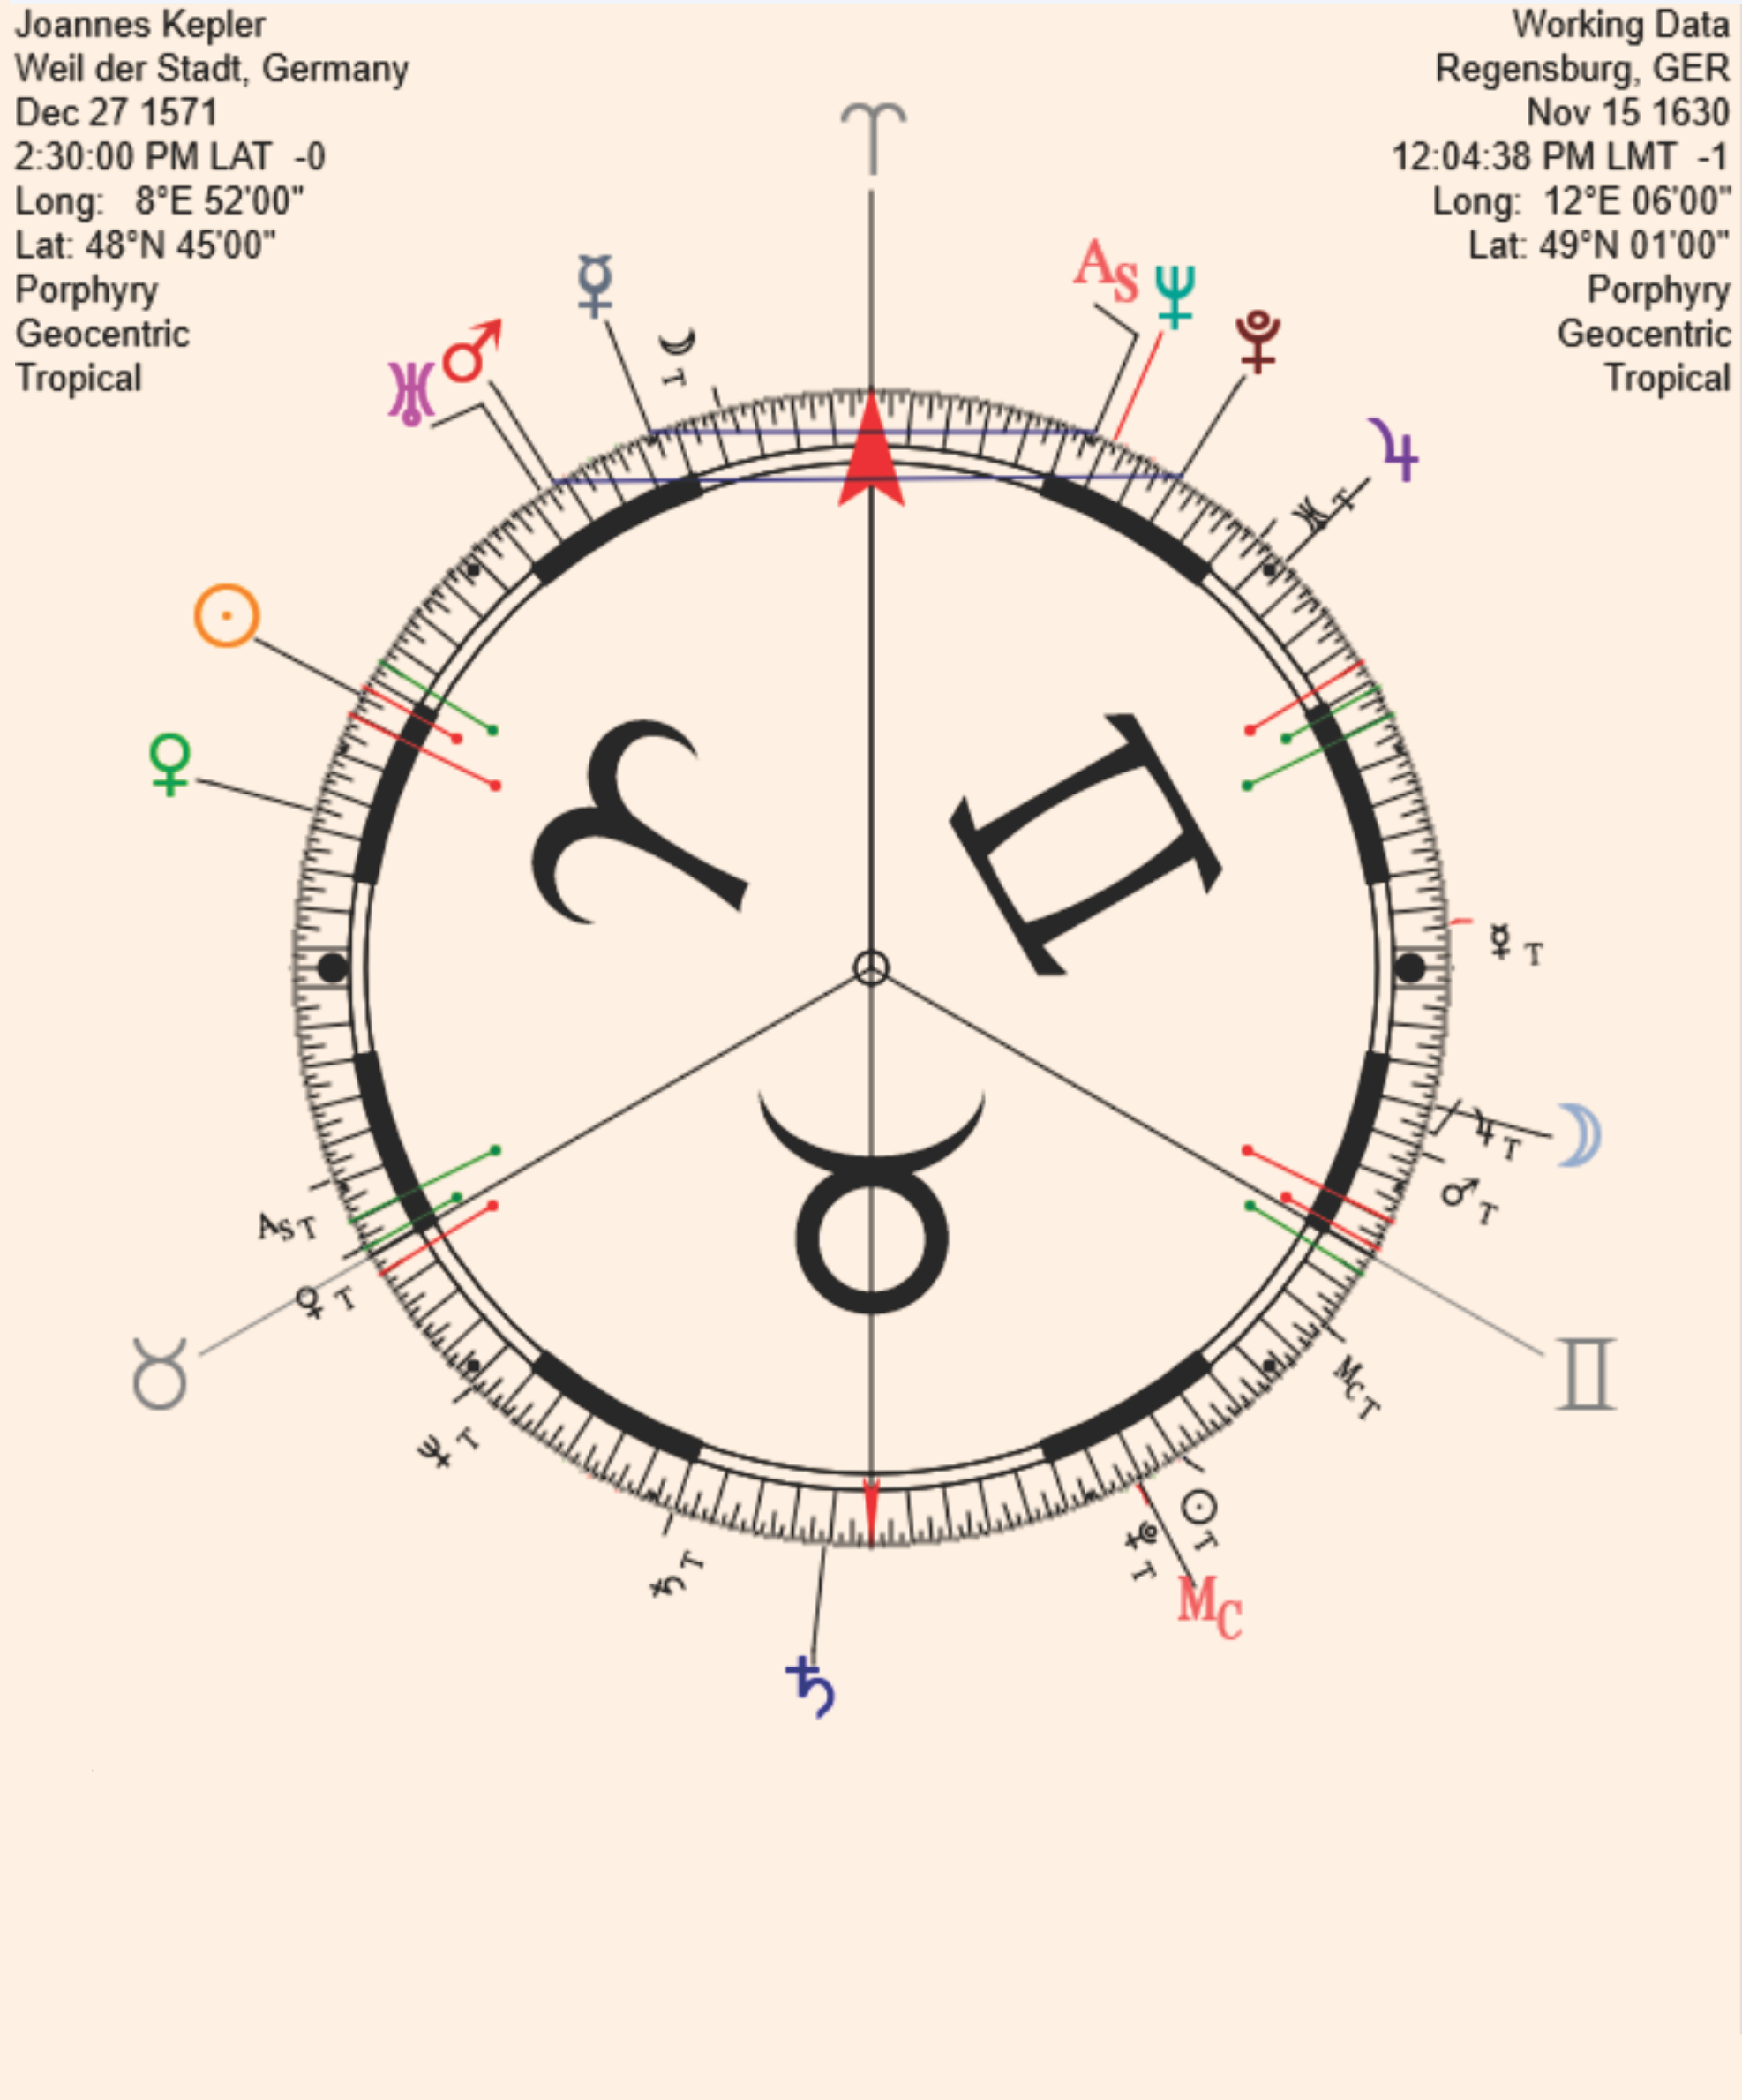
A Single Disk Analysis style 90° Dial Setup for Kepler’s Death collapses the 360° Dial’s multi-ring setup into two rings, the Dial Grid is the Transits and Ring 1 is the natal chart. The Directions are represented by the Solar Arc markings on the Dial itself. A Dual-Disk setup for the same analysis is shown on the next illustration.
The timing and location that control the setup of the Dynamics setup are the same as the controls for the Realtime button and are set in the WD (Working Data) selection. You can always return the chart to the starting conditions or save them via the Home button. All the displayed points are sensitive to the Dial Pointer and each other. With Dual Disk Analysis, you can move each Ring with all the controls available. The Working Data from the Dynamic selection will appear on the upper right-hand side of the Display Window.
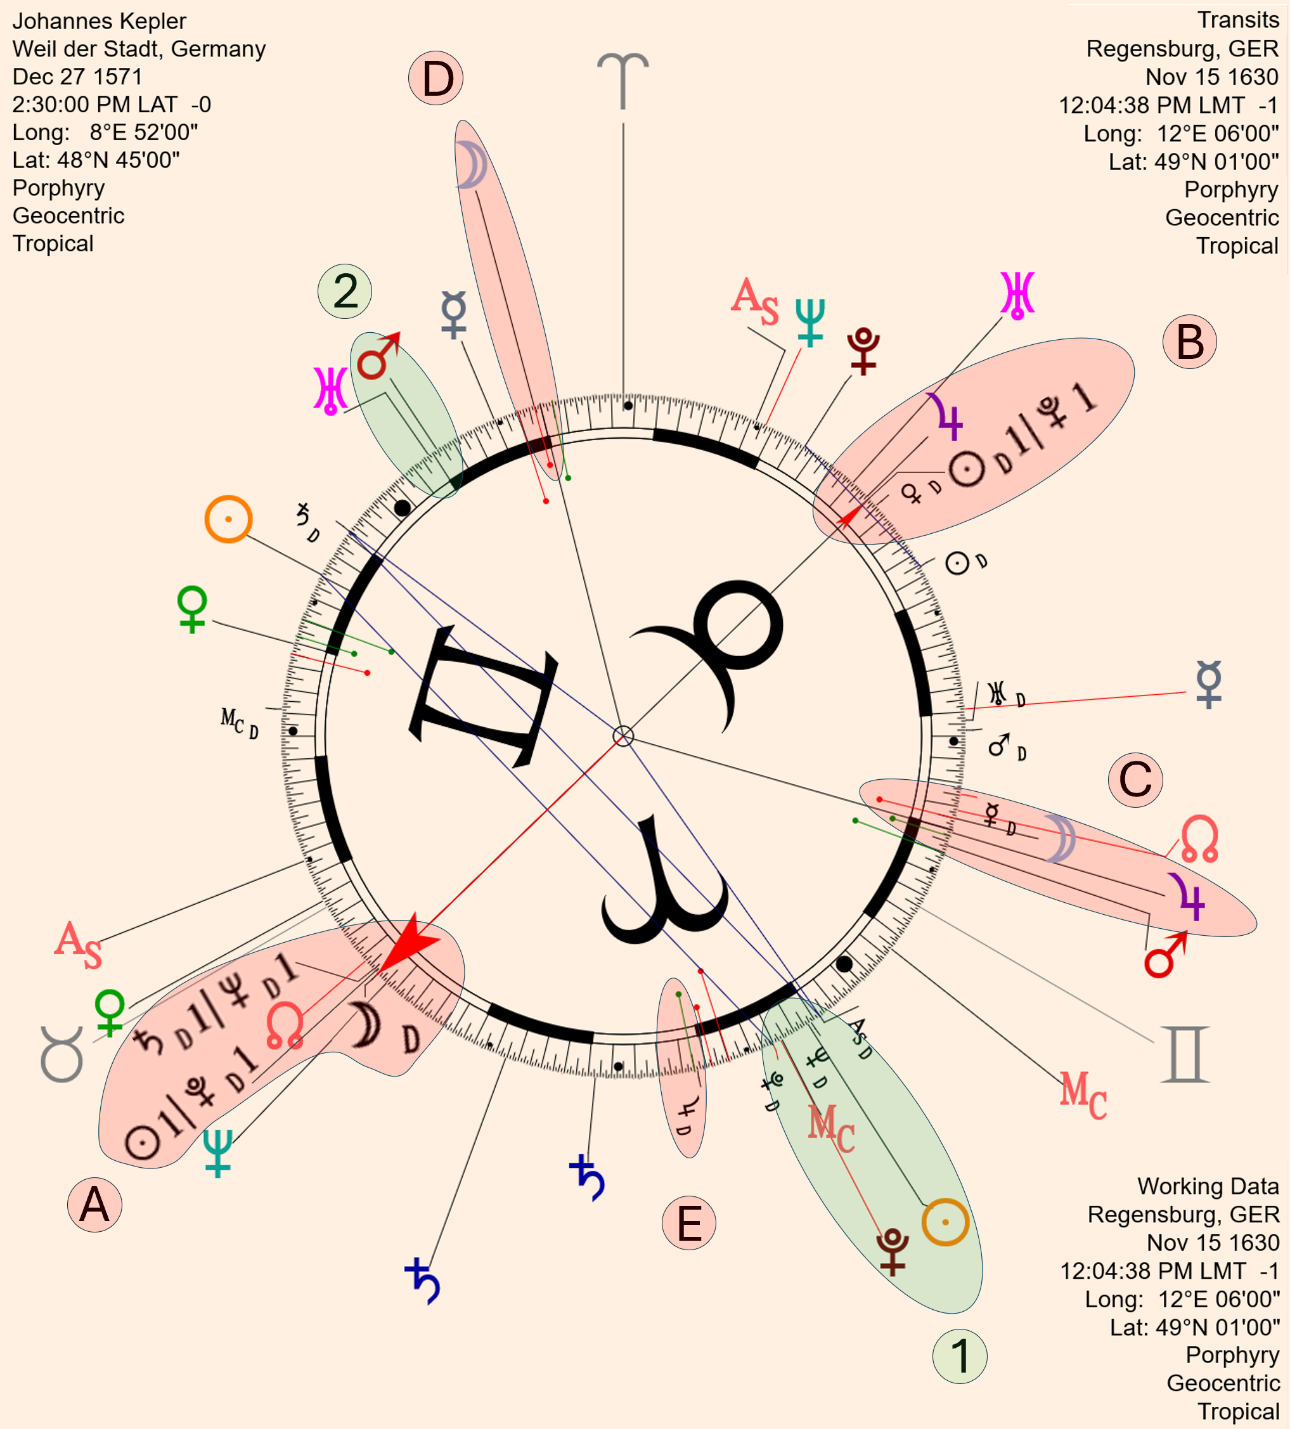
A Dual Disk Analysis style 90° Dial Setup for Kepler’s Death maintains the multi-ring 360° Dial setup. Chart rotations are not needed. For a traditional Dual Disk approach, green and red solar arc tick marks shown in the figure aren’t needed and can be turned off by unchecking “Solar Arc Ticks” in the Options menu.(They are included here for the hybrid approach discussed next.)
Alignments across multiple rings such as directed o conjunct transiting q opposite natal t (oè1 = q2 =t1) and natal k equal transiting p (k1 = p2) are easily identified (items 1 and 2 highlighted in green in the above figure).
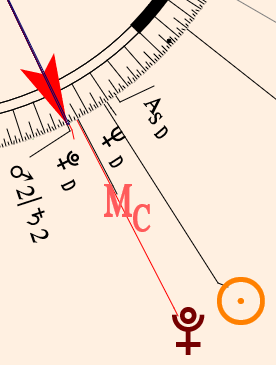
Transiting t/u (t2|u2 = Sickness, Separation Death) at 21° x 24’ 09” is active at Kepler’s passing. It is opposite directed p (21°s 27’ 28”), transiting p (21°s49’ 51”), and square Kepler’s natal k (21° v 54’ 09”). All are conjunct on the 90° dial segment above.
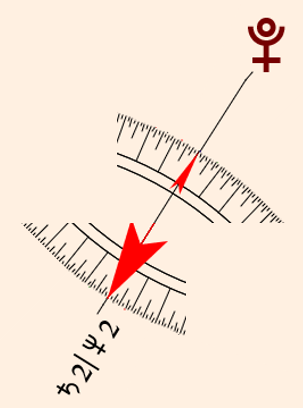
Transiting u/o midpoint (u2|o2 = sickness and diseases of long duration) at 7°x 1’ 4” is opposite natal p (on the 90° dial) at 21° n58’11” with a 3 minute orb as shown above.
Kepler became very ill at a banquet, and a few days later died in agony of a bladder infection. As a seven-month old child, he was very sickly from birth, and contracted smallpox when very young. His vision was severely defective, and he had various other illnesses fairly constantly, some of which may have been hypochondria. (https://en.wikipedia.org/wiki/Johannes_Kepler).
Solar Arc markings on the Dial add another dimension to the analysis, although certain combinations are always true and don’t add information. For example, with the Pointer on any directed factor, the corresponding natal factor always equals the inverse single solar arc (medium length red line) because directed factor = natal factor + current solar arc. (See Directed Moon Axis example described below.) Likewise, with the Pointer on any natal factor, the corresponding directed factor always equals the direct single solar arc (medium length green line).
We now examine the directed Moon Axis. Refer to the dark pink highlighted section marked A, B, C, D in the previous figure. Pointer on directed w (A:wè1 at 3°g30’46”) is opposite natal y (B:y1 at 18°n37’27”). Inverse single solar arc to natal w ( C:w1) doesn’t add information.
The midpoint of natal q and directed p (A: q1|pè1) at 18°n27’38” on the directed w(wè1) axis is 3 minutes from exact. This suggests a bodily transition and reinforces the previously mentioned transiting p (green 1: 21°s49’51”) square natal k (21°b54’09”) alignment. The midpoint with directed and natal factors reversed (B: qè1|p1) at the opposite end of the directed w axis is shown. Any combination with natal and directed factors reversed will always appear on the same axis.
Another illness confirmation is the midpoint of directed u with directed o (A:uè1| oè1) at 3°x18’47” also on directed w axis, 12 minutes from exact.
If the time of death is close, directed w is also due with transiting w (D:w2) by inverse ½ solar arc. The w y connections suggest a release from suffering.
This hybrid analysis technique utilizes both Single Disk (Solar Arc checks on the dial) and Dual Disk Analysis approaches. More can be learned by combining both methods. Further analysis is left for the reader.
For simplified analysis, that avoid these half and double solar arc considerations, use the Options menu selection “SingleArcOnly” to turn off half and double solar arc check marks.
If you right click (Mac: Ctrl + click) a Dynamic selection and create a Dual-Disk setup, to the right of the Dynamic button and above the Search toggle, two more buttons will appear. At the top is a Composite button. When you left click this toggle, the button changes to read BiDial. When you click it again, the chart reverts back to a Dual-Disk BiDial setup with the Dynamics in their own ring. When you click on Composite, the chart collapses into a single ring composite chart between the current chart and the Dynamic selected. These same controls operate this way when you add another chart for either a synastry or composite style comparison.
A Composite chart is created by taking the halfsums (calculated midpoints) between like planets (and factors); in this case the natal Sun and the transiting Sun are combined. The halfsum between the natal Sun and transiting Sun creates a new composite Sun and this planet is inserted into the horoscope. The program proceeds this way for each pair of planets (or factors) until you have a new, single chart that reflects the two charts that this composite is made from.
Below the Composite Button is a button marked I/I. This button is a toggle that switches between I/I (Inner Ring compared to Inner Ring points), I/O (Inner Ring compared to Outer Ring points), O/O (Outer Ring compared to Outer Ring points) and ALL (everything on each Ring compared to everything else regardless of the Ring it resides on). When the midpoints and Planetary Pictures (or Lots or Parts) are labeled, they have a suffix indicating the ring they reside on, either 1 or 2. This allows you to easily identify which dynamic is compared to another ring's material.
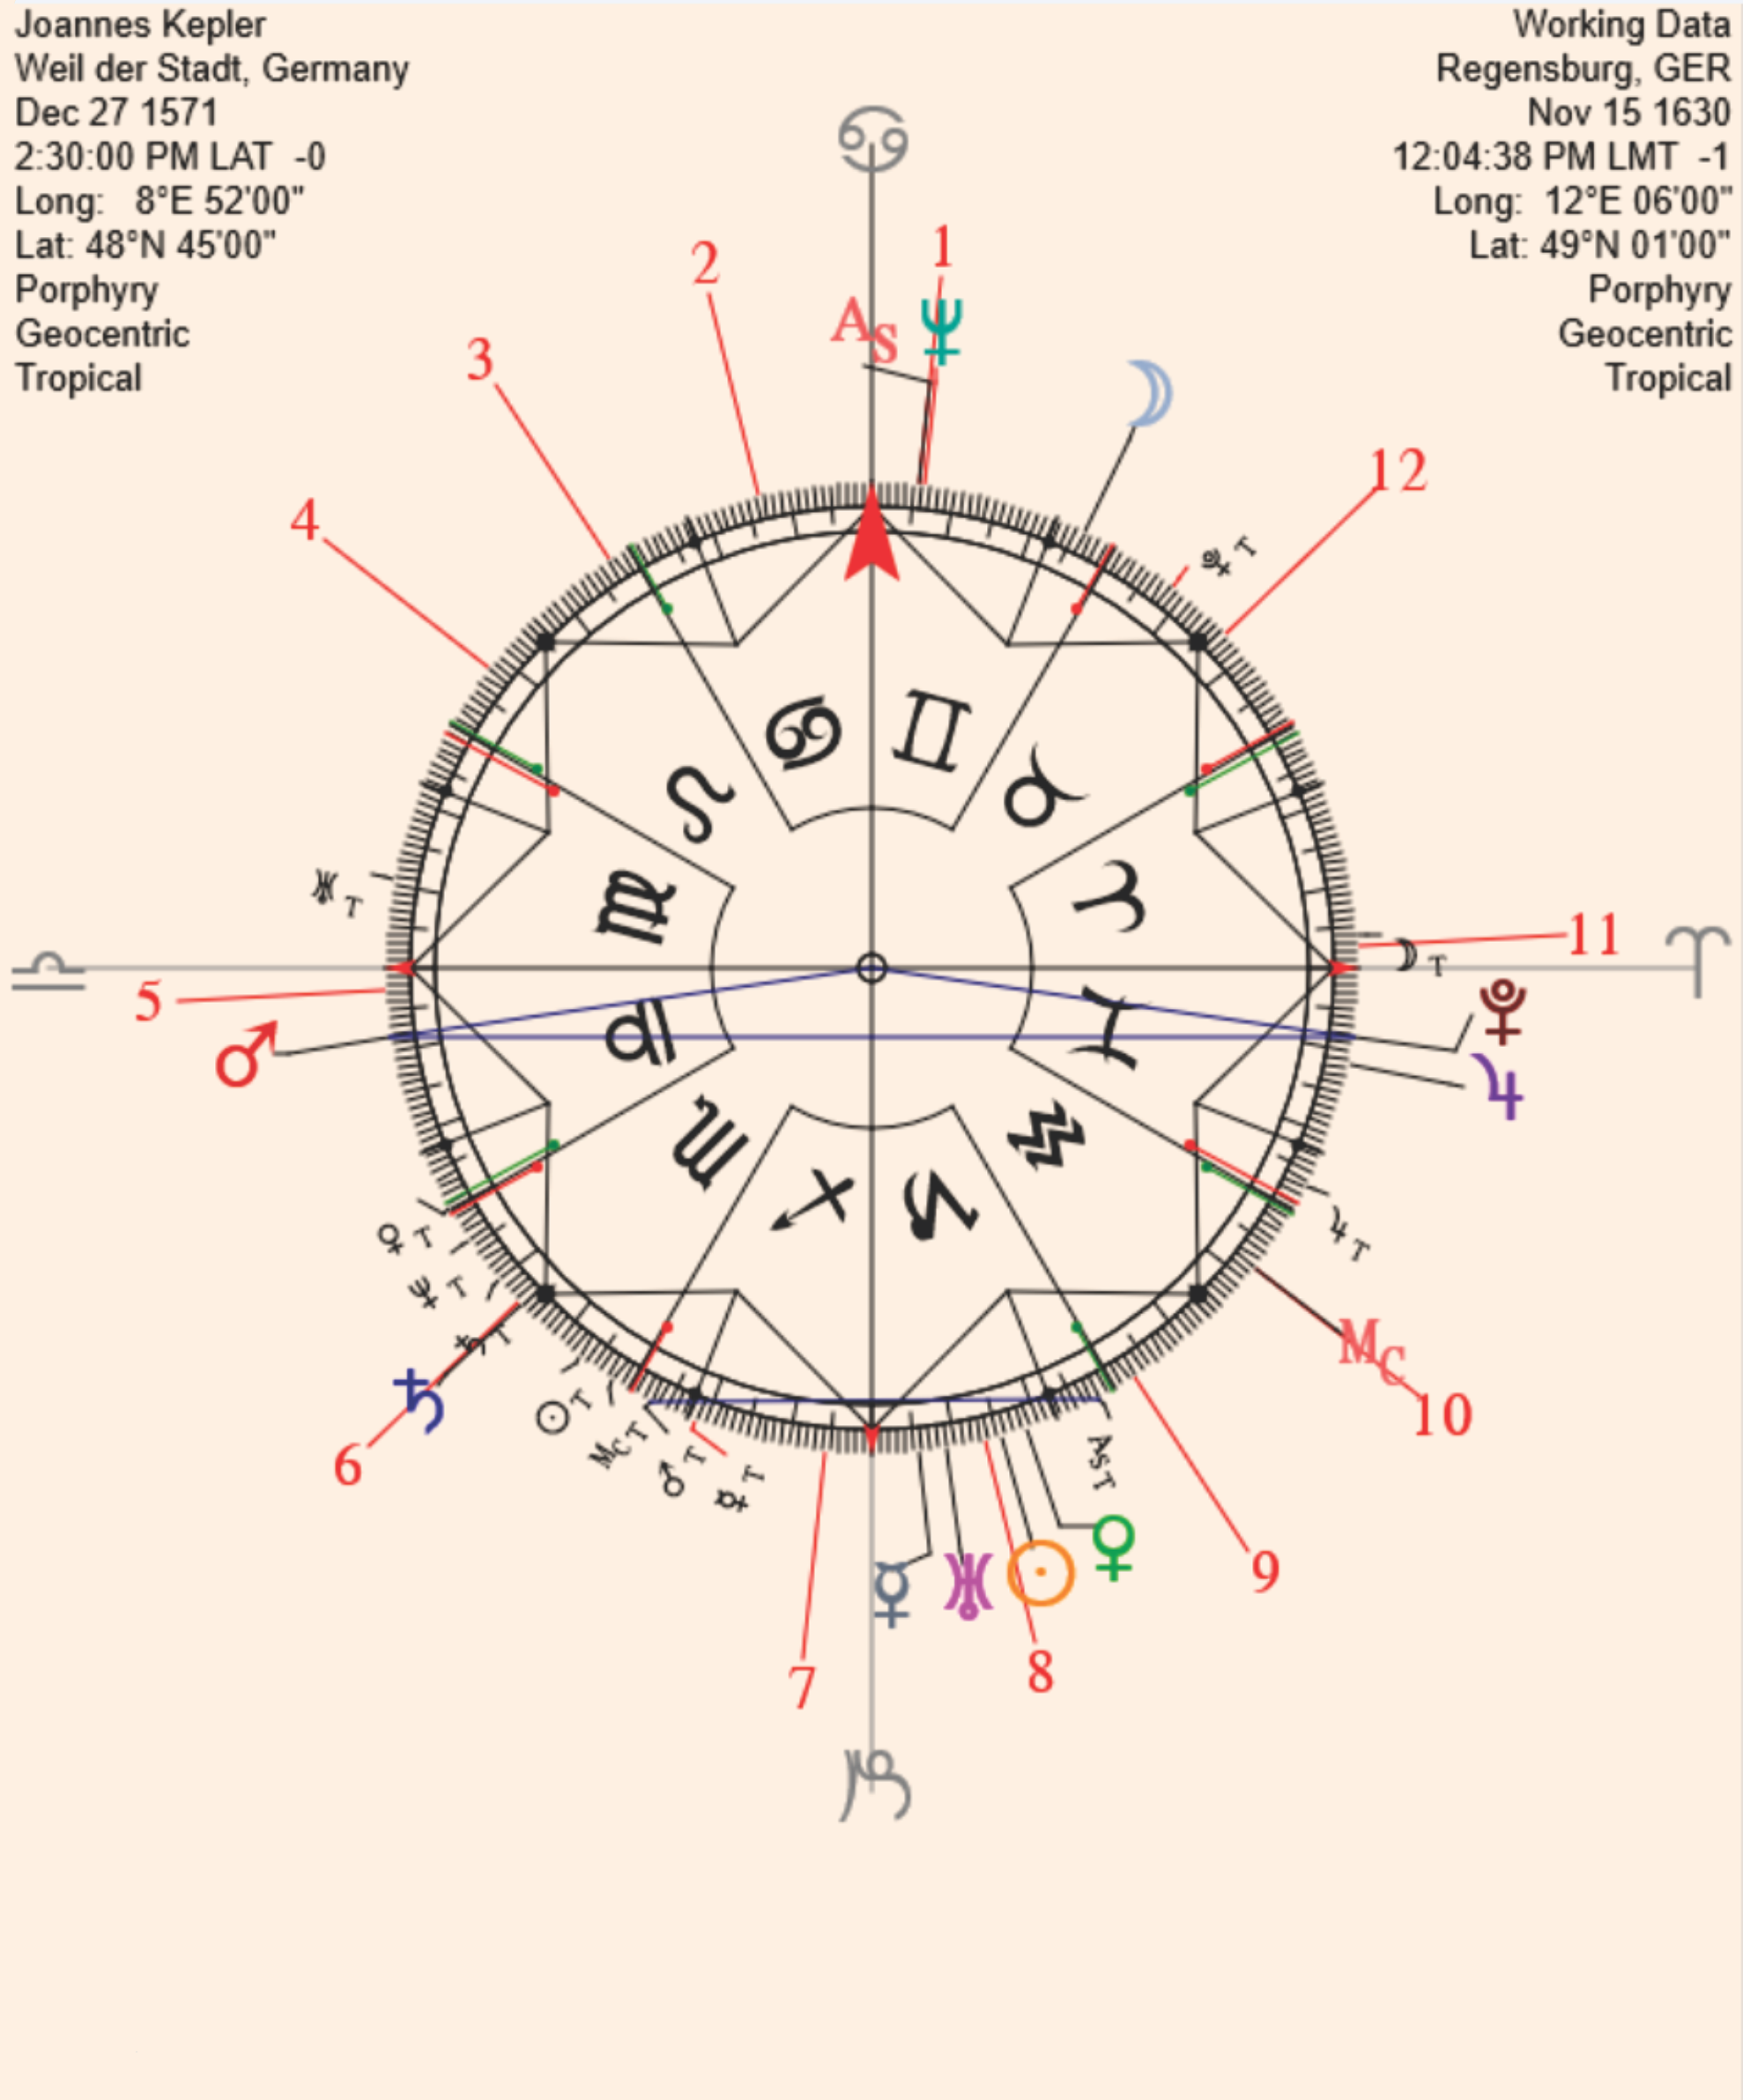
Single Disk 360° Dial setup using Kepler’s Death with all the information contained in a single Dial Grid. Without moving the Dial and just looking at the Cardinal Axis, we see he has Natal t/p standing with Transiting k/j and both Natal uand Transiting u are A each other and 45° to the Cardinal Axis. r Transiting is due by 1/2 Solar Arc. A sad parting.
In Single-Disk Analysis you can mix up the formulas using a combination of Dynamic and static positions. When advancing the Dial in Time the formulas will update accordingly allowing you to zero into coming combinations with great precision and speed.
When you left click on the Dynamic in question, no new ring is established and the new material is added to the single Dial Grid. The glyphs are smaller than the original chart’s glyphs and have a subscript indicating whether they are transits, progressions or directions. It is a simple setup and uses the Dial Grid Solar Arc markings to show completed pictures and combinations.
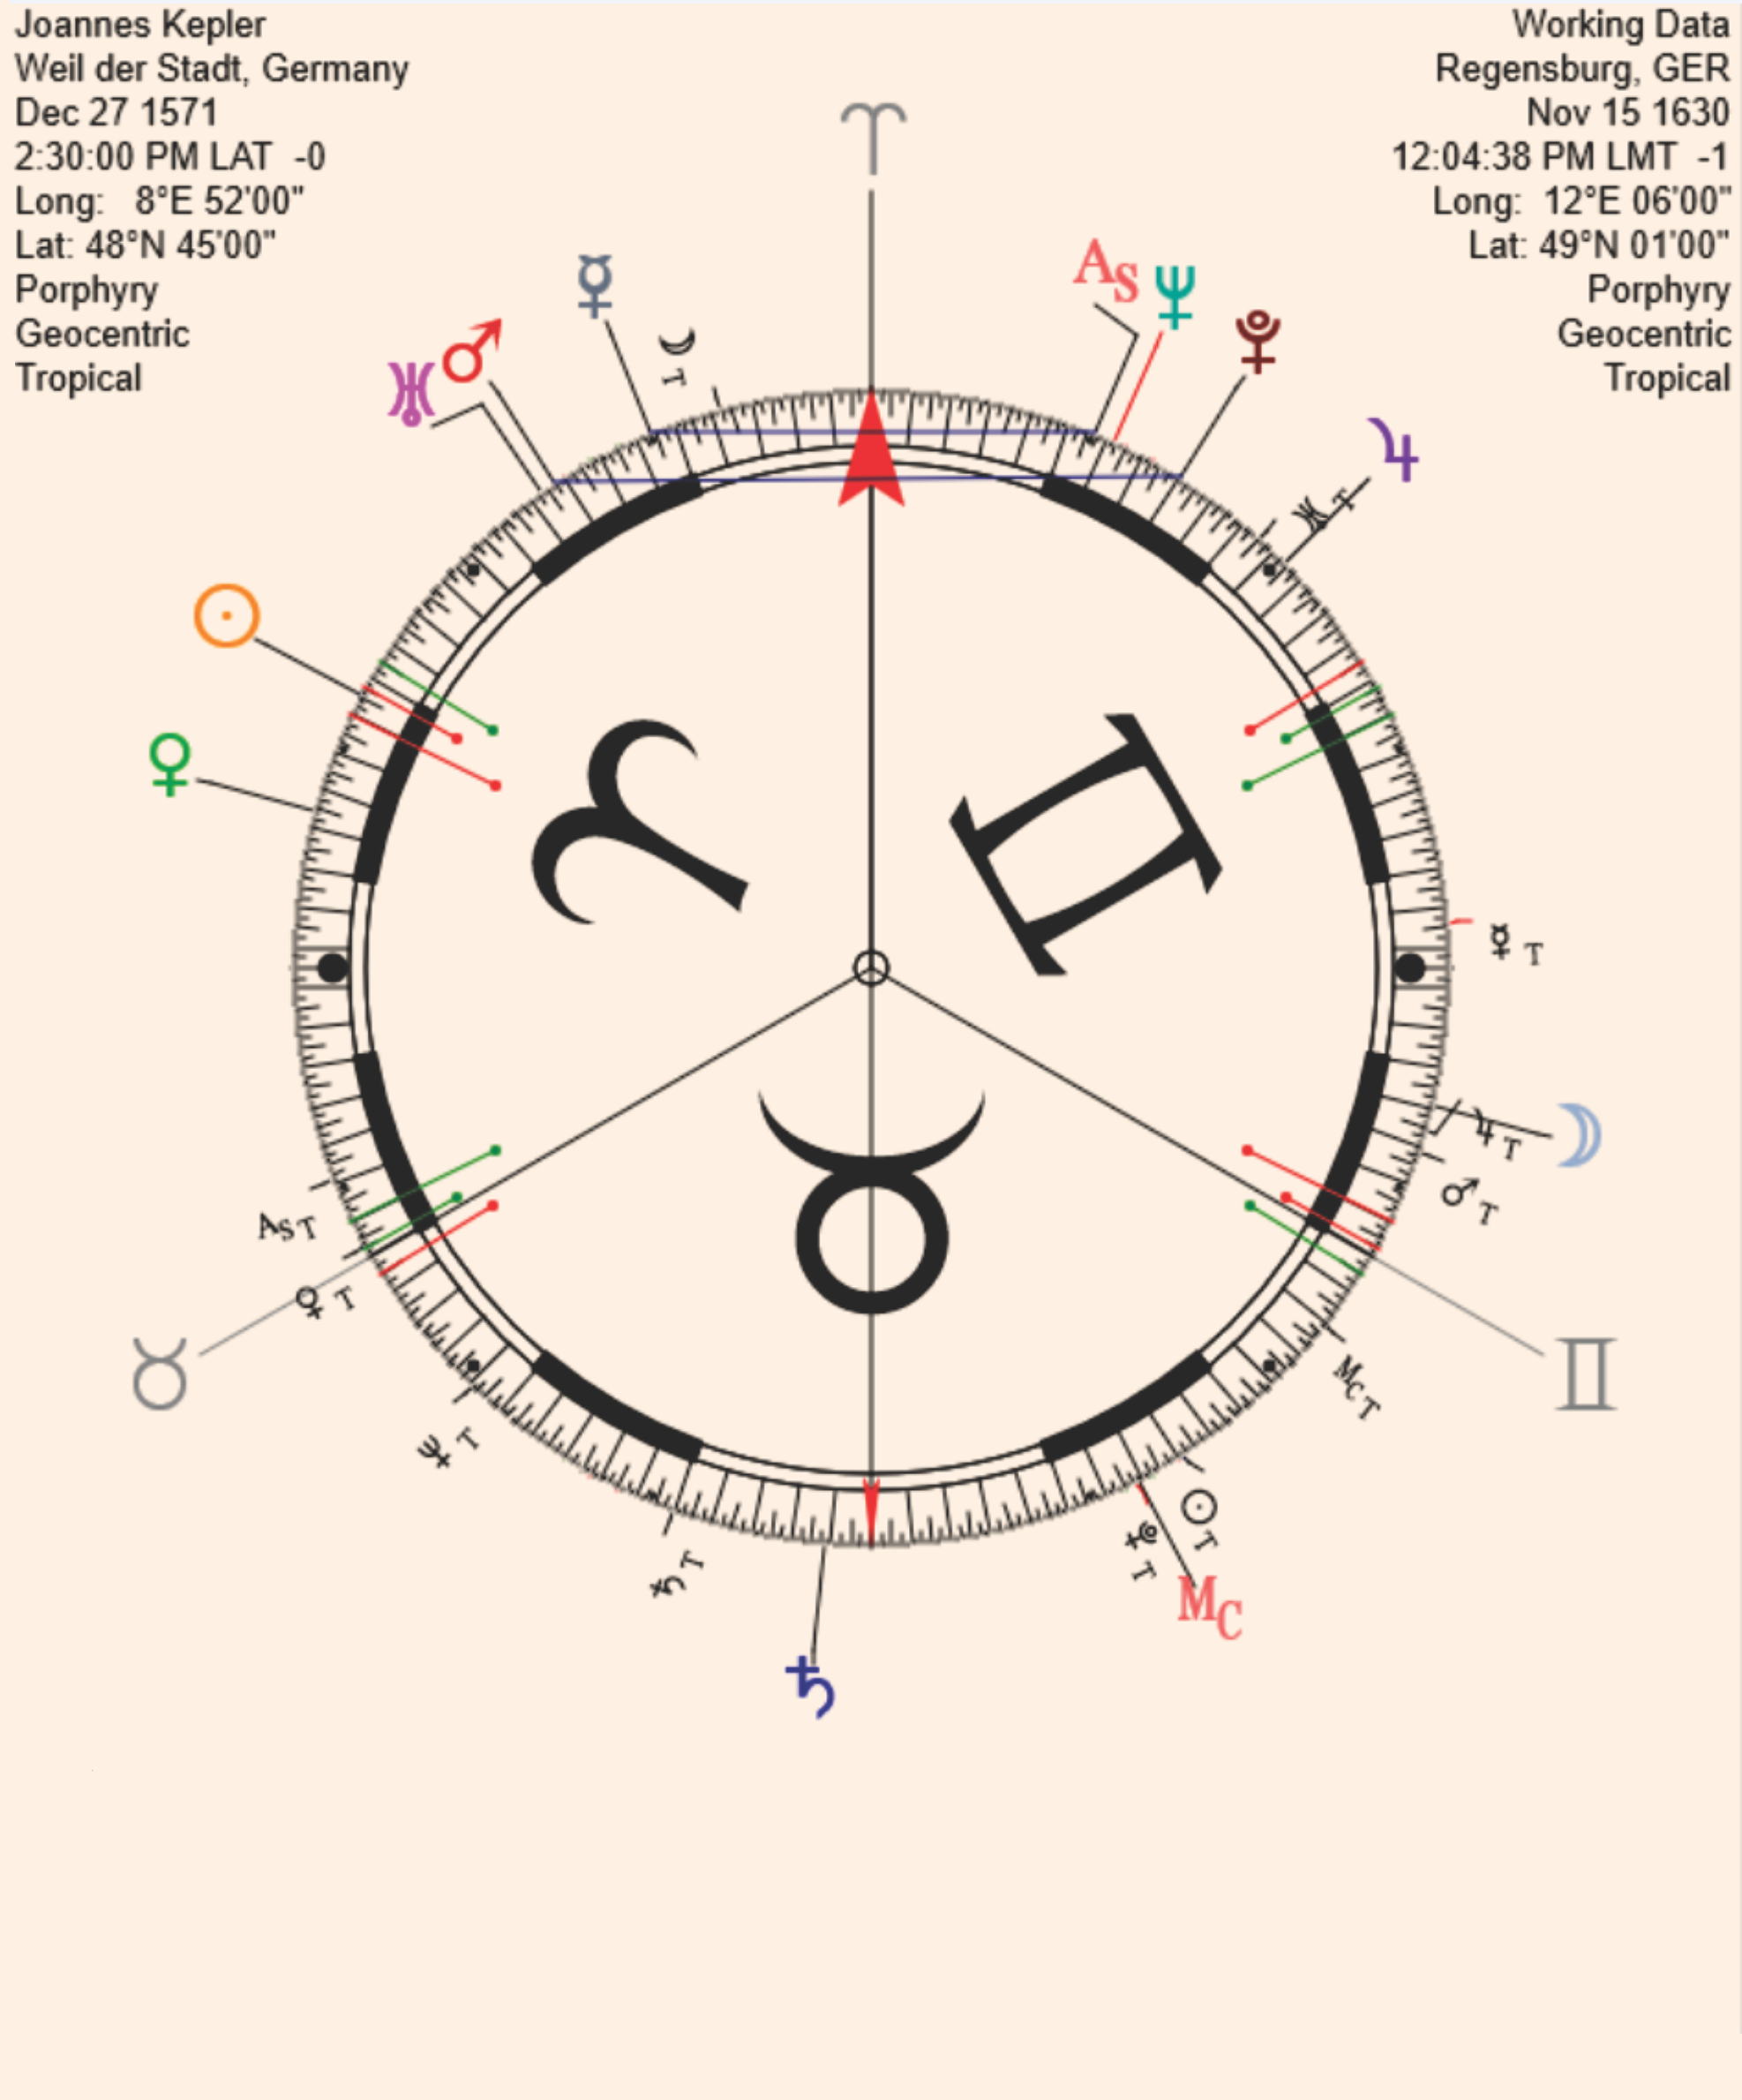
Single-Dial 90° Dial Setup for Kepler’s Death allows us to use the Dial as a microscope. Note that the Dial is still on the Cardinal Axis like the 360° Dial in the previous illustration. We lose the Transiting k/j and Natal uAu Transiting because the orb is too wide but Natal e/j is now added to our overall Picture. The Transiting ris shown to still be exactly on the ½ Solar Arc and due with the Cardinal Axis and we see Transiting p directly on the Natal k by square. A tighter confirmation of what we observed in the more general 360° Dial, on the previous page.
When adding Solar Arc measurements onto the mix of other Dynamics and original charts, it allows for interesting and powerful combinations to be noticed that may escape observation by other means. This method also allows mixes of Static and Dynamic combinations that move in time, setting up long term Dynamic and moving pictures that time events that are active over a longer term of action than most of the instantaneous type combinations that characterize orthodox astrology.
The Single Disk methods emphasize recognition of the Law of Equal Openings (two or more Equal Arc openings where the distance between two factors is the same as another two factors [or a hard harmonic of the four factors], etc.). This is called Resonance and the 4 factors form a completed Planetary Picture that is symmetrical and if there are hierarchical factors involved, like the Personal Points, becomes a very powerful combination that is invisible in orthodox methods of astrology. Such combinations are the foundations of character and destiny. While generally relatively easy to find with the right tools like Dials and various graphs, such pattern recognition is virtually impossible to see with an orthodox 12 house style day chart.
The Dynamic button is a very powerful set of timing tools that can be setup to analyze the timing of a horoscope in very detailed and efficient ways. When combined with some of the other tools and selectable buttons, these basic ideas expand to give you more powerful abilities of recognition and timing of a chart.